
6.1 Valid Breakout and False Breakout
A breakout is not price touching the outside of a line. It means the market accepts a new price area.
A valid breakout should be judged by at least three things:
- The boundary was clear before the breakout, with repeated rejection or acceptance around that area.
- The breakout candle is not only a wick probe. The real body closes clearly above resistance or below support.
- Price does not immediately return to the old range. It either follows through or retests and holds the old key area.
Invalid breakouts usually show the opposite:
- Only a wick pierces the level, while the close returns to the old range.
- There is no speed, volume, or follow-through after the breakout.
- The next candle, or the next few candles, quickly reverse the move.
- Price falls back below resistance or reclaims support and forms opposite structure.
Do not ask only “did it break?” Ask “did it hold?” A break that does not hold is not a high-quality breakout.
6.2 Breakout-Retest Process
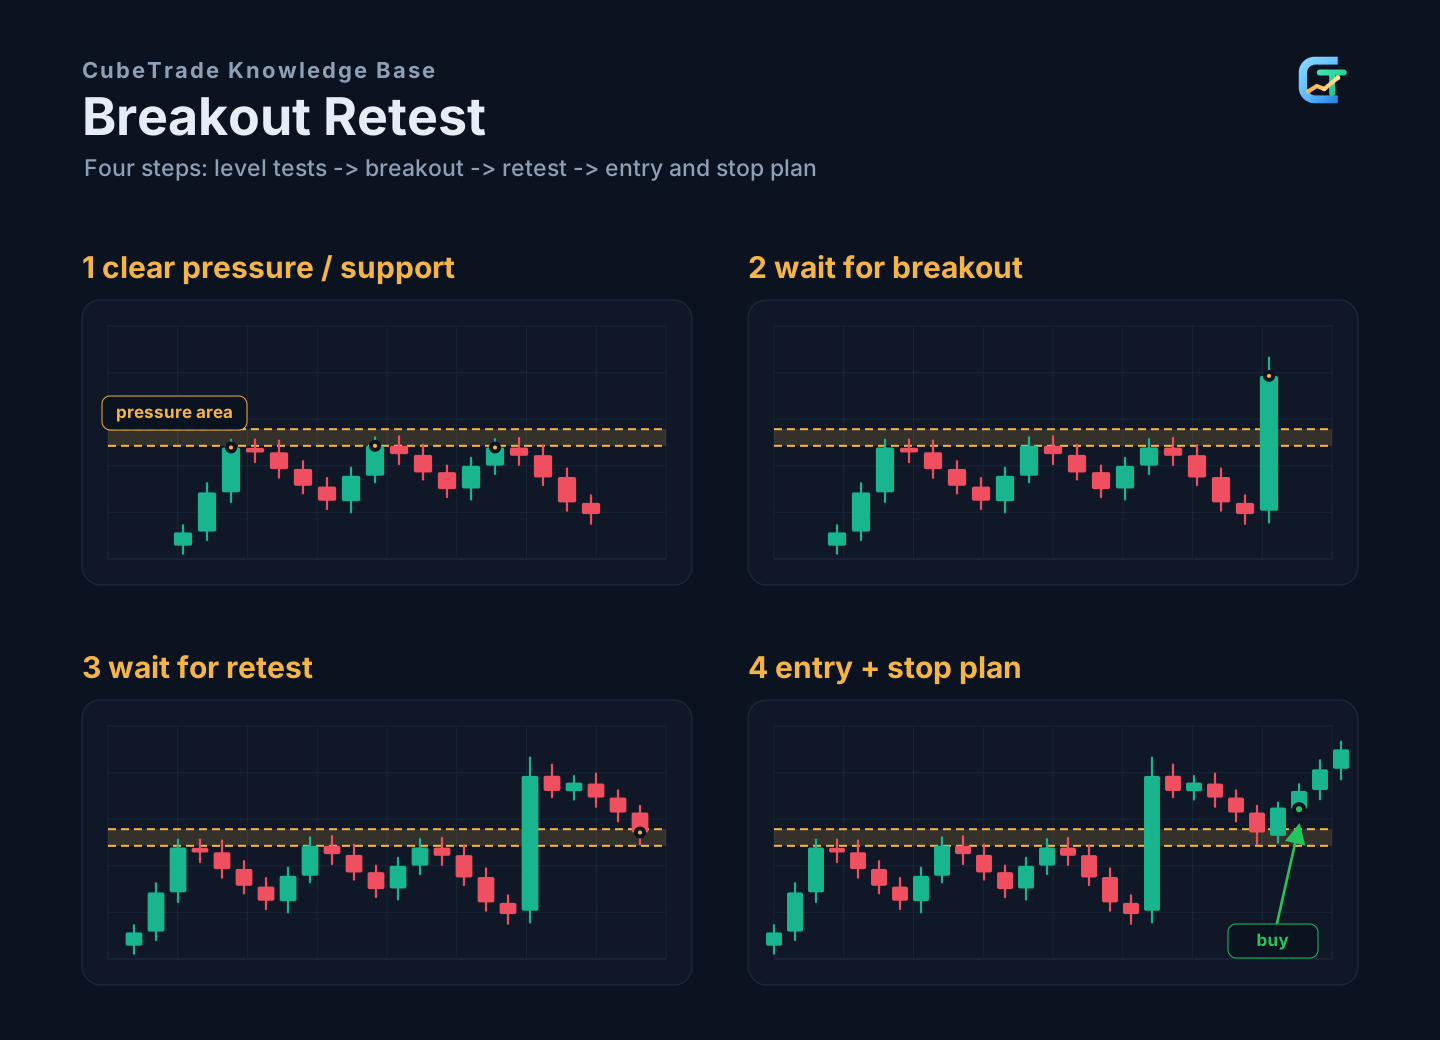
In a breakout-retest setup, the key is not to chase the breakout itself. The key is to observe whether the market accepts the new price area after the breakout, and whether the old key level truly changes role during the retest.
A high-quality breakout-retest scenario needs at least four elements:
- There is a clearly visible prior resistance or support area, not a boundary drawn after the fact.
- The breakout has force: the real body closes clearly above resistance or below support.
- The retest returns to the breakout area or old boundary and shows buying or selling reaction, instead of falling straight back into the old range or being explained from a location far away from the breakout.
- Stop, target, and invalidation conditions are defined before entry, so the risk and reward of the trade are controlled.
If any one of these elements is missing, it is not a high-quality breakout-retest scenario. The first large candle after a breakout is not the opportunity by itself. What matters is whether the later retest can hold the original key area. Retest confirmation filters many false breakouts, but the cost is missing some direct acceleration moves.
Cases that do not qualify as high-quality breakout-retest setups include:
- Old resistance or support was touched only once and the boundary is unclear.
- The breakout is only a wick probe, with no real-body hold.
- Price immediately falls back into the old range after breakout, showing the market did not accept the new price.
- The retest is too deep and already back inside the old range; calling it “retest confirmation” is backward justification.
- The retest area has no demand or rejection candle and no lower-timeframe structure turn.
- The stop has to be placed so far away that target space is insufficient.
The point of breakout-retest is not “buy after breakout no matter what.” It is to let the market prove whether old resistance has really become new support, or old support has really become new resistance. Only after role conversion is confirmed does the trade have a clear risk boundary.
6.3 Structural Breakout
Structural breakout focuses on changes in swing highs and lows, not simply crossing a line. A line breakout only says price crossed a boundary. A structural breakout suggests the market rhythm may have changed.
A high-quality bullish structural breakout needs:
- Price breaks a previous high or key resistance.
- The retest does not fall back into the old structure; the previous high area shows acceptance.
- Price rises again after the retest, showing continuation rather than a one-time spike.
- Later lows continue to rise, shifting the structure from rejection to advance.
A high-quality bearish structural breakout is the opposite:
- Price breaks a previous low or key support.
- The rebound cannot reclaim the support area.
- Old support becomes resistance.
- Price continues down, with both highs and lows moving lower.
If there is a breakout but no retest confirmation, no follow-through, and no change in swing structure, it is only a boundary break. Do not treat it as a structural breakout yet.
Management after structural breakout matters just as much. For longs, do not automatically chase the instant price breaks the previous high. First observe whether price retests the previous-high area and holds. If it holds, the previous high can be treated as new support for observation, and the stop usually belongs below the retest low, the structure’s launch point, or the new support-failure point. If price continues forming higher lows, the previous valid low can be used to gradually move the risk boundary up, rather than moving the stop randomly.
Bearish structural breakout is the opposite. After a previous low breaks, do not chase the end of a large bearish candle. Observe whether the rebound cannot reclaim the previous low or old support area. If old support turns into resistance, and bearish candles or lower-timeframe weakness also appear, the stop finally has a clear location. The value of structural breakout is not only “price started rising or falling”; it is that market rhythm changed in a way you can review later.
6.4 Entry Confirmation and Confluence
The purpose of entry confirmation is to turn “I think it may move” into “the market has provided observable evidence.” Confirmation can come from:
- Trend direction.
- Support/resistance location.
- Candlestick reaction.
- Pattern boundary.
- Moving-average support or resistance.
- Fibonacci area.
- Divergence.
- Volume.
Confluence is not stacking as many signals as possible. Effective confluence must satisfy four conditions:
- The signals occur in the same key area, rather than being collected from unrelated locations.
- They point in the same direction. For example, structure, candle reaction, and moving-average rhythm support the same scenario.
- There is a clear sequence: location first, reaction second, trigger third.
- The risk boundary is clear; you know where the idea fails.
If many signals conflict, wait instead of forcing an explanation. Price-action confirmation comes before indicator confirmation. Indicators can strengthen a case, but they cannot replace structure.
6.5 Trend Pullback
The key to a trend pullback is not that price has dipped. The key is whether the pullback remains inside a valid trend. Before a trend is established, a pullback is just ordinary fluctuation.
A high-quality trend pullback needs:
- Trend structure is already present: higher highs and higher lows in an uptrend, or lower highs and lower lows in a downtrend.
- The pullback does not damage the key structure. In an uptrend, it should not effectively break the previous low or main support. In a downtrend, it should not effectively reclaim the previous high or main resistance.
- The pullback reaches a meaningful location, such as a previous-high retest, trendline, EMA20/EMA21/EMA50, or Fibonacci 0.5 or 0.618 area.
- There is a reaction at that location, such as an acceptance candle, engulfing candle, lower-timeframe structure turn, or renewed volume support.
- The stop can be placed beyond the structure-failure point, not at an arbitrary emotional price.
If the pullback has already broken a key low, moving-average slope has weakened, and rebounds can no longer make new highs, do not keep calling it a trend pullback. It may have entered trend exhaustion or reversal validation.
A common mistake in trend-pullback trading is treating “price dipped a little” as a pullback opportunity. A real pullback needs an existing trend first; otherwise it is ordinary fluctuation. The pullback location must matter; otherwise you are catching a falling move in the middle. There must be reaction after price reaches the area; otherwise price merely touched an indicator. If price repeatedly breaks previous lows, moving averages turn from support into resistance, and each rebound becomes weaker, treat it as declining trend quality instead of continuing to look for reasons to enter with the trend.
6.6 Four Common Entry Methods
No entry method is absolutely best. Know the cost of your choice.
First, breakout entry.
Enter when price closes through a key level. Advantage: you do not miss strong moves. Disadvantage: false-breakout risk and wider stops.
Best suited when:
- The boundary is clear and has been tested multiple times.
- There was compression or buildup before the breakout, not a random single candle.
- The breakout has force and the real body closes clearly beyond the key area.
- There is enough space beyond the breakout direction, without immediate major resistance or support.
Not suited when:
- The breakout is only a wick probe without real-body close confirmation.
- Price breaks directly into a higher-timeframe support or resistance area.
- The stop would be too wide and reward-to-risk is not acceptable.
The cost of breakout entry is low tolerance for error. You gain a better chance of not missing the move, but you must accept false-breakout risk and worse stop location. If the boundary is unclear, target space is too small, or the stop is too wide, do not enter early just because you fear missing out.
Second, retest entry.
Wait for price to retest the old key level after breakout and enter after support/resistance flip confirmation. Advantage: better reward-to-risk. Disadvantage: strong trends may not retest.
Best suited when:
- Price does not immediately run far away after the breakout.
- Old resistance becomes support, or old support becomes resistance.
- The retest area shows candle confirmation.
Not suited when:
- The retest falls straight back into the old range, or a rebound immediately reclaims old support.
- There is no buying or selling reaction at the retest area.
- You keep waiting for a retest while ignoring that the trend has already failed.
The cost of retest entry is missing strong continuation. You gain better reward-to-risk, but you must accept that the market may not give you a retest. If the retest is too deep or too far away, it is no longer the original model; do not force it.
Third, reversal-confirmation entry.
At support/resistance, trendline, moving average, or pattern boundary, wait for reversal candle or lower-timeframe structure turn. Advantage: clear stop. Disadvantage: needs strong context filter.
Best suited when:
- Price is near a higher-timeframe key level.
- There is a false breakout or momentum exhaustion.
- Lower-timeframe structure turns.
Not suited when:
- You trade against a strong trend based only on one reversal candle.
- The reversal signal appears in the middle of a range, far from a key level.
- The stop is unclear or the target space is insufficient.
The cost of reversal-confirmation entry is slower confirmation. You gain a clearer invalidation point, but the entry is often farther from the turning point. If the location is not extreme and the context is not strong, do not treat an ordinary reaction as reversal.
Fourth, scale-in entry.
Use small size first, then add after confirmation. Advantage: more tolerance. Disadvantage: more complex and easily becomes emotional.
Best suited when:
- The broad direction is clear, but the entry is not perfect.
- Volatility is high and a full-size entry is not appropriate.
- You have clear add and exit rules.
The bottom line for scaling in is this: even the first probe position must have a stop. Add only after the plan is confirmed by the market. Do not average down just because the position is losing.
The cost of scaling in is management complexity. You gain more tolerance, but you must accept that position changes cannot be emotional. Without add rules, a probe position can easily become a stubborn losing position.
6.7 Entry Signals Must Serve Risk Boundaries
Many ask “where to enter” but not “can this entry define risk?” A good entry is not buying the lowest or selling the highest; it is one that allows a reasonable stop.
A good long entry usually:
- Is near support, retest, or structure confirmation.
- Allows stop below the logic-failure point.
- Has acceptable stop distance.
- Has enough upside target space.
A bad long entry often:
- Chases the end of a large bullish candle.
- Requires a very wide stop.
- Runs into resistance immediately.
- Leaves uncertainty on every pullback.
Entry must be designed together with stop, target, and position size.
6.8 Recognizing False Breakouts
False breakout is one of the most common traps. It often uses stop orders, breakout chasers, and emotional orders near key levels.
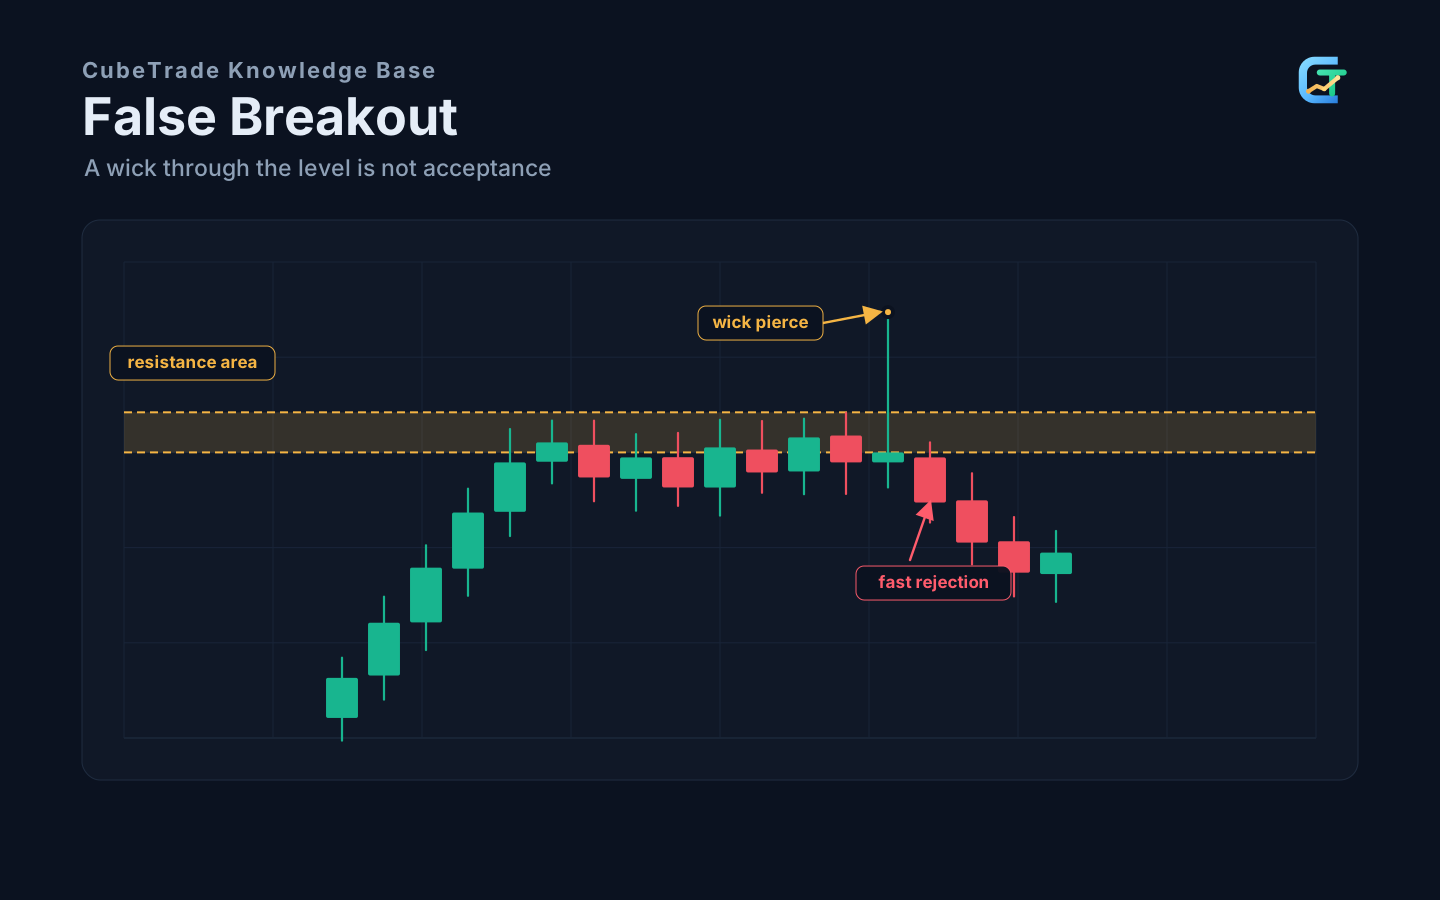
The first principle is: a wick breakout is not a valid breakout. What matters is real-body close, follow-through, and whether the opposite side takes control.
Common features:
- Breakout appears only as a wick without close confirmation.
- After breakout, volume or speed cannot continue.
- The next candle quickly reverses.
- Price returns to the old range and breaks short-term opposite structure.
- It occurs near higher-timeframe support or resistance.
The value of a false breakout comes from “failure.” If an upside breakout fails and price returns into the range and breaks support, trapped buyers may drive the move down. If downside break fails and price reclaims, trapped sellers may fuel the move up.
Do not treat every failed breakout as a reversal opportunity. It only has trading value when the failure happens at an important level and later price action confirms that the opposite side has taken control. Waiting is not missing out; it is filtering noise. Missing part of a breakout is usually easier to fix than being trapped in a false breakout.
When recognizing false breakouts, separate “failure signs” from “opposite trigger.” A wick pierce and close back into the range only show that the breakout was not accepted. After a failed upside breakout, the opposite trigger usually needs a short-term support break or strong bearish engulfing. After a failed downside breakout, it usually needs a reclaim of the key level plus a short-term resistance break or strong bullish engulfing. Without an opposite trigger, you can abandon the breakout chase, but you should not immediately enter the other way.
6.9 Bull Traps and Bear Traps
A bull trap is not a mysterious manipulation term. It is a market behavior result: price breaks above a key level, attracts breakout buyers, then fails to continue and falls back below.
A bear trap is the opposite: price breaks below a key level, attracts short sellers, then reclaims quickly and forces covering.
Check four things:
- Did it happen at an obvious key level?
- Did the breakout attract chasers?
- Did the breakout lack continued speed and volume?
- Did price quickly return to the old range and confirm opposite structure?
If price is still chopping around the key area and has not truly left the structure, do not rush to label it. Let a few more candles print; the direction will often become clearer. Do not label every pullback or rebound as a trap. The label is not important; the trapped order flow is.
6.10 Complete Short Setup Conditions
Shorting is not “I feel it will drop,” and it is not guessing the top. High-quality short setups usually come from two scenarios: a failed upside breakout that quickly reverses, or a break below key support followed by a failed rebound.
A complete short plan usually needs:
- Higher timeframe weak or price at major resistance.
- Rally cannot break previous high and forms lower high.
- Support breaks, or upside breakout fails.
- Old support retests as resistance, or bearish candle confirms.
- Stop can be placed above the invalidation point.
- There is enough downside target space.
Common short-signal locations fall into three categories.
First, the previous-high resistance area. Price rallies into a previous high, main resistance, or higher-timeframe resistance area, then stalls, leaves a long upper wick, forms bearish engulfing, or fails on high-volume upside attempt. This shows buyers tried to attack but the market did not accept it. The stop usually belongs above that rebound high or the resistance-failure point.
Second, second-rebound confirmation. Price has already fallen from a high area, then rebounds again but cannot break the previous high, forming a lower high. If this rebound has lower volume, weak closes, or is rejected by moving averages and old support, sellers still control the rhythm.
Third, previous-low breakdown confirmation. After a previous low or key support is broken by real body, do not chase the end of the large bearish candle. Wait for a lower-timeframe pullback. If that pullback cannot reclaim old support and old support turns into resistance, the short setup has a clearer trend-following boundary.
Common shorting mistakes:
- Shorting a strong uptrend only because RSI is overbought.
- Shorting just above support.
- Chasing after a large decline with wide stop and little space.
- Ignoring borrowing, margin, funding, or liquidation risk.
6.11 Trade Plan Template
Before each trade, write:
Instrument:
Timeframe:
Direction:
Market state:
Key location:
Entry trigger:
Stop location:
Target location:
Single-trade risk:
Position sizing:
Invalidation condition:
No-trade condition:
Review focus:
No-trade condition is very important. Without it, any market movement can be interpreted as opportunity.
6.12 Practice
Review the last ten locations where you wanted to enter and classify each:
- Breakout entry.
- Retest entry.
- Reversal-confirmation entry.
- Scale-in entry.
- Emotional chase.
If many trades cannot be classified, they were not system trades but impulsive decisions.